What I wanted
Before actually doing anything, I needed to know exactly what I wanted. And it was pretty simple. I wanted a simple service running on an old laptop that would allow me to create blogposts about things I liked. I searched a bit on the internet, and found Hugo. It allows the creation of blog posts with markdown and a bit of yaml, which is perfect for me. I already had a domain name, and I’ve already used traefik in the past, so it was a no brainer for me to used this domain (dalmatheo.dev), and Traefik.
Setting up the basics
DNS records
The first thing to do when you want to host a reverse proxy (Traefik) is to set up the DNS records you want to use. Because I’m hosting my server at home, in a normal setup, when a client connect to a service (like the whoami traefik service), the IP of the client is not correct, because the traffic goes through my router that erase the original IP. Therefore, if I want a bit of protection (especially because I want to setup a nextcloud service later), I would want to find a way to get the real IP of the client. To do so, I can simply use cloudflare proxy feature that I have to enable in the DNS records.
The first record you want to create is an A record, taking all the traffic from your base domain (in my case dalmtheo.dev) and redirecting it to your home IP. You also have to enable the proxy from cloudflare for everything to work properly.
After that, just create another A record, taking all the traffic from wildcard (all subdomains of your base domain), redirecting it to your home IP. You also have to enable the proxy here. Here’s what it looks like at the end:

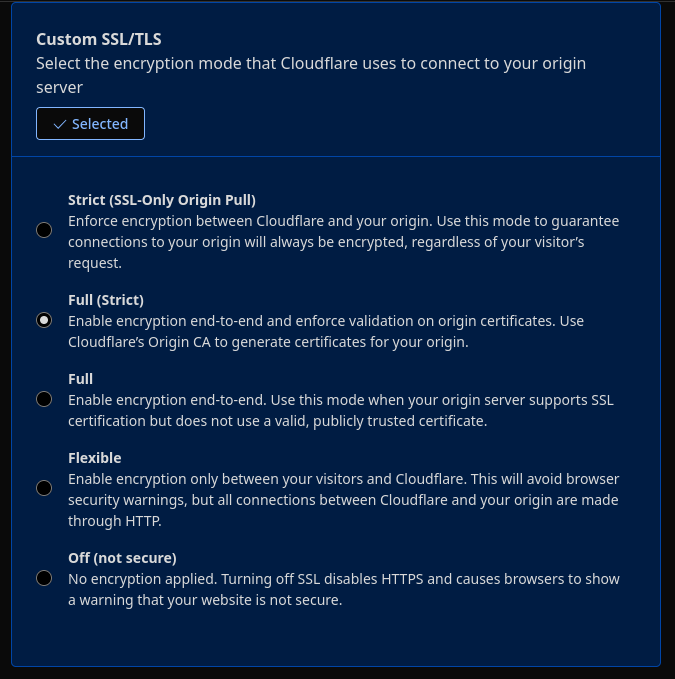
Note that because we are using a reverse proxy, we will have to set under SSL/TLS the custom “Full (Strict) " option as shown here:
Port Forwarding on Router
On your router, you will have to enable port forwarding for the 80 and 443 ports to the server that will host traefik.
Installing docker and docker-compose
We will be using docker-compose files to use traefik and our other services (Hugo in that case). I am using archlinux on my home server. To install docker on arch, you have to execute the commands:
sudo pacman -S docker docker-compose
You’ll then have to start the docker.service using systemctl:
sudo systemctl enable --now docker.service
Finally, you’ll have to add your user to the docker group to be able to execute all of the commands:
sudo usermod -aG docker $USER
If you need more support, you can check the dock here.
Setting up traefik
The docker compose file
Here’s a simple docker-compose.yml file that you can use:
services:
  traefik:
    image: traefik:latest
    environment:
        - CF_DNS_API_TOKEN=CloudflareToken
        - [email protected]
    container_name: traefik
    restart: unless-stopped
    ports:
      - "80:80"
      - "443:443"
    volumes:
      - /var/run/docker.sock:/var/run/docker.sock:ro
      - traefik_config:/etc/traefik
      - /etc/certs:/etc/certs
    command:
      # Dashboard et API
      - --api=true
      - --api.insecure=false

      # Providers
      - --providers.docker=true
      - --providers.docker.exposedbydefault=false
      - --providers.file.directory=/etc/traefik
      - --providers.file.watch=true

      # Web Entrypoint
      - --entrypoints.web.address=:80
      - --entrypoints.web.forwardedHeaders.trustedIPs=173.245.48.0/20,103.21.244.0/22,103.22.200.0/22,103.31.4.0/22,141.101.64.0/18,108.162.192.0/18,190.93.240.0/20,188.114.96.0/20,197.234.240.0/22,198.41.128.0/17,162.158.0.0/15,104.16.0.0/13,104.24.0.0/14,172.64.0.0/13,131.0.72.0/22

      - --entrypoints.web.http.redirections.entrypoint.to=websecure
      - --entrypoints.web.http.redirections.entrypoint.scheme=https
      - --entrypoints.web.http.redirections.entrypoint.permanent=true
      - --entrypoints.web.transport.respondingTimeouts.idleTimeout=30s

      # Websecure Entrypoint
      - --entrypoints.websecure.address=:443
      - --entrypoints.websecure.forwardedHeaders.trustedIPs=173.245.48.0/20,103.21.244.0/22,103.22.200.0/22,103.31.4.0/22,141.101.64.0/18,108.162.192.0/18,190.93.240.0/20,188.114.96.0/20,197.234.240.0/22,198.41.128.0/17,162.158.0.0/15,104.16.0.0/13,104.24.0.0/14,172.64.0.0/13,131.0.72.0/22
      - --entrypoints.websecure.http.tls=true
      - --entrypoints.websecure.transport.respondingTimeouts.idleTimeout=30s

      # Let's Encrypt ACME DNS Challenge via Cloudflare
      - --certificatesresolvers.letsencrypt.acme.dnschallenge=true
      - --certificatesresolvers.letsencrypt.acme.dnschallenge.provider=cloudflare
      - --certificatesresolvers.letsencrypt.acme.dnschallenge.resolvers=1.1.1.1:53,1.0.0.1:53
      - --certificatesresolvers.letsencrypt.acme.dnschallenge.delaybeforecheck=30s
      - --certificatesresolvers.letsencrypt.acme.email=${ACME_EMAIL}
      - --certificatesresolvers.letsencrypt.acme.storage=/etc/certs/acme.json
      - --certificatesresolvers.letsencrypt.acme.caserver=https://acme-v02.api.letsencrypt.org/directory

      # Logs
      - --log.level=TRACE
      - --accesslog=true

    networks:
      traefik_bridge:
        ipv4_address: 172.20.0.2
    labels:
      - "traefik.enable=true"
      - "traefik.http.routers.dashboard.rule=Host(`traefik.yourdomain.com`) && (PathPrefix(`/api`) || PathPrefix(`/dashboard`))"
      - "traefik.http.routers.dashboard.service=api@internal"
      - "traefik.http.routers.dashboard.entrypoints=websecure"
      - "traefik.http.routers.dashboard.tls.certresolver=letsencrypt"

      - "traefik.http.routers.dashboard.middlewares=auth"
      - "traefik.http.middlewares.auth.basicauth.users=dalmatheo:$$2y$$05$$CovVO0VpPnIFUEYTl9gSjeMKH1dvNEZX0AvIBw9hCqHMnQiz7y5/S"

  whoami:
    image: traefik/whoami:latest
    container_name: whoami
    restart: unless-stopped
    networks:
      traefik_bridge:
        ipv4_address: 172.20.0.3
    labels:
      - "traefik.enable=true"
      - "traefik.http.routers.whoami.rule=Host(`whoami.yourdomain.com`)"
      - "traefik.http.routers.whoami.entrypoints=websecure"
      - "traefik.http.routers.whoami.tls.certresolver=letsencrypt"
      - "traefik.http.services.whoami.loadbalancer.server.port=80"

volumes:
  traefik_config:
    driver: local
  acme_data:
    external: true

networks:
  traefik_bridge:
    external: true
    driver: bridge
    ipam:
      config:
        - subnet: 172.20.0.0/16
Environment variables
    environment:
        - CF_DNS_API_TOKEN=CloudflareToken
        - ACME_EMAIL=Acme Email
Inside the file, you will have to complete this.
CF_DNS_API_TOKEN is the variable used by traefik to get the CF token to be able to access the DNS, and be able to modify it (or use dnschallenge for letsencrypt). To create one, you’ll have to go on your profile in the top right of your dashboard, then API Tokens, and you’ll have to set the Zone.Zone and Zone.DNS permissions.
ACME_EMAIL is the email that will be used to create your SSL/TLS certificate using letsencrypt. If your certificate is expired, it will send you an email, but you shouldn’t worry about that because traefik automatically renew them. However, this variable is still required.
Trusted IPs
Inside of the docker compose file, you’ll find two lines that looks like this:
- --entrypoints.entrypoint.forwardedHeaders.trustedIPs=173.245.48.0/20,103.21.244.0/22,103.22.200.0/22,103.31.4.0/22,141.101.64.0/18,108.162.192.0/18,190.93.240.0/20,188.114.96.0/20,197.234.240.0/22,198.41.128.0/17,162.158.0.0/15,104.16.0.0/13,104.24.0.0/14,172.64.0.0/13,131.0.72.0/22
Those lines are very important because it tells traefik to trust cloudflare IPs that will add headers for the reverse proxy to function correctly (it will basically tell traefik the real IP of the clients). You can learn more about it here.
Last modifications
To finalize this installation, the last thing you’ll have to do is to replace yourdomain.com with your actual domain name. At that point, traefik should be correctly configured. To check if everything works, you can execute inside of the folder that contains your docker compose file the following command:
docker-compose up
Traefik should get the certificate after around 1 minute. After that, you should be able to access whoami.yourdomain.com, and see your IP under X-Forwarded-For, as well as one of cloudflare ips.
Starting Traefik
To start traefik, you can simply use the following command where your docker compose file is:
docker-compose up
Additionnaly, you can use the -D argument to execute the container in the background.
Setting up Hugo
The docker compose file
Here’s a simple docker-compose.yml file that you can use:
services:
  hugo:
    image: ghcr.io/gohugoio/hugo:latest
    container_name: hugo
    restart: unless-stopped
    ports:
      - "1313:1313"
    volumes:
      - /var/run/docker.sock:/var/run/docker.sock:ro
      - /hugopath:/src
    working_dir: /src
    command: server --bind=0.0.0.0 --baseURL https://yourdomain.com --appendPort=false
    networks:
      traefik_bridge:
        ipv4_address: 172.20.0.5
    labels:
      - "traefik.enable=true"
      - "traefik.http.routers.hugo.rule=Host(`yourdomain.com`)"
      - "traefik.http.routers.hugo.entrypoints=websecure"
      - "traefik.http.routers.hugo.tls.certresolver=letsencrypt"
      - "traefik.http.services.hugo.loadbalancer.server.port=1313"

networks:
  traefik_bridge:
    external: true
    driver: bridge
    ipam:
      config:
        - subnet: 172.20.0.0/16
Setting up the files for Hugo
For Hugo to work, you’ll have to create a folder (or a docker volume). I chose to create a folder, because it is easier to edit (by setting up a samba server for example). Inside of that folder (or volume), you’ll have to create a hugo.yaml or hugo.toml file. Here is a page from their docs that can help you a ton.
Changing the URL
In the docker compose file, you’ll find yourdomain.com written two times. You’ll have to replace that with your website domain, wether it is your base domain (yourdomain.com) or a subdomain (blog.yourdomain.com).
Starting Hugo
To start hugo, you can simply use the following command where your docker compose file is:
docker-compose up
Additionnaly, you can use the -D argument to execute the container in the background.